How to Continue Bullets in Powerpoint
I love helping people improve their Microsoft PowerPoint skills.
Most people would agree that bullet points in Microsoft PowerPoint are sometimes tricky. It can be really frustrating when the bullets seem like they're always changing, and you are constantly re-setting the size, indents, and position. In order to create concise, logical, and multi-level contents using PowerPoint, one should be able to use bullet points freely.
In general, there are three key tips you should remember and practice constantly, which I shall go into detail in the following paragraph. Believe me, all the skills are quite simple, can be learned in just three minutes, and will give your PPT an amazing look.
Part 1: Control the Appearance of a Bullet Point
Things to remember:
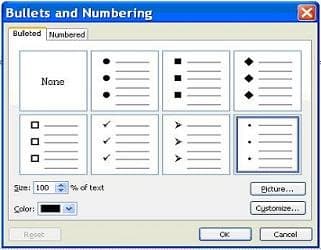
Use Format>Bullets and Numbering to do all the tricks.

Figure 1. Use Bullets and Numbering to do all the tricks.
Practice:
1. Open your Microsoft PowerPoint, Select Files>New to set up a new blank PPT slide.
2. Type in some text—anything you want.
3. Select one sentence and choose Format>Bullets and Numbering. There you will see all the functions to change the appearance of a bullet point.

Figure 2. Import pictures.
4. Now, you should know about the difference between a picture and a symbol. A picture is a .gif file. You can create it in other softwares and import it into PowerPoint. And you can only change the size of a picture bullet, not the color. But for a symbol, you can change the size and the color of it.
5. Go to "Size" to set how big you want your bullets to be in comparison with the word character. Usually 75% would have a nice look.
6. Go to "Color" to set your desired color.
7. Go to "Picture" to set a picture as your bullet. Or you can import your very own picture by using "Import" (the easiest way is to create a 12*12 pixels .gif file in your Photoshop or whatever).
8. Or go to "Customize" to set a symbol as your bullets. Done!
Scroll to Continue
Part 2: Control the Level of a Bullet Point
You can learn the following tip in just one minute to create multi-level bullets.
Things to remember:
Shift+Alt+→/← will take you to any level you want.

Figure 3. Multi-level content.
Practice:
1. Select the text, press Shift+Alt+→ to move it to a second level, and press Shift+Alt+→ again to move it to a third level.
2. If you want to make it back to the first level, just press Shift+Alt+← two times. It's easy!
Part 3: Control the Indent of a Bullet Point
Tired of playing around with bullet points and failing to position them correctly? The following tips will solve the problem once and for all. It's a little difficult here, however, as you need to remember several hot keys. But don't worry, I will show you the easiest way of doing it in just one minute.
Things to remember:
1. All the secrets are about controlling upper/lower triangles on the ruler.
2. Press Alt or Control keys at the same time.
3. Remember, you should never use space to make the indent, it will only make things worse.
Practice:
1. Go to View>Ruler to show the ruler. As you can see, there are triangles alongside the ruler. The below figure shows the relationship between these triangles and indents.

Figure 4. Relationships between triangles and indents.
2. The indent is the space between a bullet and the text. So controlling indents is all about controlling upper/lower triangles on the ruler and the spaces between them.
3. You can just drag the upper/lower triangle to the position you want to make indents.
4. To drag one triangle without moving the other triangle, you will need to press Ctrl and drag.
5. For any minor adjustment, you will need to press Ctrl+Alt and drag.
6. Practice more. You need some time to get familiar with the tips of dragging.
This article is accurate and true to the best of the author's knowledge. Content is for informational or entertainment purposes only and does not substitute for personal counsel or professional advice in business, financial, legal, or technical matters.
sheena on October 17, 2017:
I know how to change level in bullets. But when the bullets and subbullets are different shapes how do you go from one to the other automatically??
Molly on April 22, 2012:
Thank you for posting this! I couldn't figure out for the life of me how to move back up levels with bullet points...
ADorso on January 13, 2012:
Is there a way for me to lock bullets so no level appears below the 3rd level?
Microsoft Powerpoint Free Download Fan on July 21, 2011:
Fascinating article. Lots of interesting information.It's such a pity that Microsoft Powerpoint is so expansive.
Kayla on July 16, 2011:
Hello, I was wondering how you would change the indents for an entire document. For example, I use a lot of outlines, and thus a lot of different levels with bullet points in a Microsoft Word Document. So, when I get far down into say, level 5, I am only using half of the page to type. So, I want the entire document to have smaller indents throughout the whole thing, so that I don't have to go through and adjust each line by itself. I figured out how to adjust the "hanging indent" thing, but when I try to adjust the indent size in mass, it aligns every bullet point to the same level...
How do i do this?
DavidLivingston on November 30, 2010:
This is helpful. Thanks for posting this hub.
Source: https://turbofuture.com/computers/How-to-get-control-of-bullet-points-in-Microsoft-Powerpoint-once-and-for-all-All-the-secrets-in-just-3-minutes
0 Response to "How to Continue Bullets in Powerpoint"
Post a Comment